Step 1 - The Impression of the Ear Canal is scanned into the system. The scanning process works by using
a number of cameras to take 3D images of the physical impression.
Step 2 - Once the impression is scanned, the Hearing Aid is developed using 3D design software. This
images shows one of the steps in the initial cutting down process in which the canal length is shortened from the original
impression canal length.
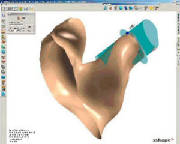
Step 3 - Fig.3 shows that the Hearing Aid vent being added to the shell. Inside the shell you can also
see virtual electronic components. Although the electronic components are added manually in the final stage of production
the virtual placement in the shell during the manufacturing process means that we can be sure that he electronics will fit
properly and aso so that the shell can be made as small as possible.
Step 4 - The hearing ai is built using lasers which harden a photoplastic acrylic material. In Fig.
4 you can see the laser hardening the shell material.
Step 5 - The finished shells are shown in Fig.5. The shells are built on tiny platforms which support
the shell whilst they are being manufactured. After removal from the manufacturing until the platforms are removed and shell
is polished and lacquered.
Step 6 - In Fig. 6 you can see the shells prior to final polishing and lacquering. Inside the shell
you can see a tag which identifies the shell. The tag is build during the manufacturing process and identifies the shell so
that we can correctly match the hearing aid shell with the customer order.
Step 7 - The final product. After polishing and lacquering the electronics are fitted to the shell.
The resut is a hearing aid that is smaller, providing an optimum fit, reducing feedback and occlusion.